The default for this is 'Yes'. When enabled, if an update for HSpot is available, you will be asked if you would like to update your software (approximately 2 minutes after you start HSpot with an Internet connection). If selected, HSpot will download the update and install it on your computer. The update will 'take effect' the next time you start up HSpot. Select the option to exit HSpot and start it again if you wish to access the update immediately. You may though download the update, finish your session and then choose to close HSpot to make the update effective. It is strongly recommended that you allow auto-updates.
When selected, only the AORs with the ON flag checked will be summed in the "Total Duration" shown at the bottom right of the main AOR table. This function is useful for getting the total time for a subset of AORs.
This option allows you to select a default coordinate system displayed in the tables in HSpot. Options include equatorial (B1950, J2000), ecliptic (B1950, J2000), Galactic or super-galactic coordinate displays.
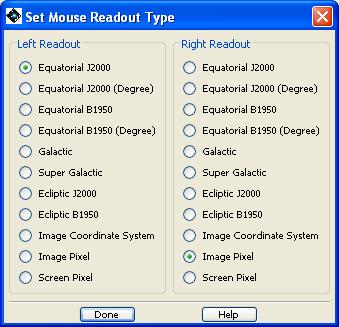
HSpot returns three different pairs of values for the cursor position (Figure 6.34, “HSpot cursor information”) just below the main icon bar when displaying an image. To the left, HSpot shows the flux or DN value for the pixel and the pixel scale. For the ISSA images, these values are correct. For the 2MASS images, you should not rely on the DN readout for photometry. Use the 2MASS catalogues (click on the table icon to the right of the image to see the tabulated data for all the sources that were found in the search) for accurate scientific data values. In the centre and right boxes, HSpot displays two user-selected values for the present cursor position. The "Readout Prefs" dialogue is how you select those values. For example, you can display the equatorial and ecliptic coordinates, or any coordinate system versus image pixel. The read-out works for both the main image display and the thumbnail display shown to the right of the read-out boxes.
The format of the two coordinate columns shown in Figure 6.34, “HSpot cursor information” is selected from the "Readout Prefs" item in the Options menu Figure 6.35, “dialogue for selection of displayed coordinates for images”.
HSpot caches the images that it retrieves from remote servers to the local disk so that the images are available locally the next time you ask HSpot to display them. This saves time and network traffic. The first time you retrieve an image, HSpot will ask you to designate a cache directory. You can change the location or size of the disk cache directory from this dialogue (Figure 6.36, “Disk cache dialogue”).
If you select this option, you will see two options "Direct Connect to Internet" and "Manual Proxy Configuration". If your institution has a firewall or proxy server in place, you will want to select the "Manual Proxy Configuration" option and fill in the appropriate values for HTTP and HTTPS proxy ports and hosts, as well as proxy user name and password. It is recommended that you check with your systems administrator for the proper values, though, these can often be found by checking in your internet browser, "Preferences"/"Options," then "Advanced," and then "Proxies."
If you check this box, HSpot will display messages in the region above the Images and AOR frames that provide help for using the mouse. For example, if you put your cursor over the image thumbnail (Figure 6.29, “Herschel Focal Plane overlay”, far right), it tells you that you can move the image by using the left mouse button.
This allows you to manage your screen menus and controls for the currently displayed image. If you are working on a very small screen, you may wish to turn off the sidebars on the right hand side of the image that allow you to manipulate overlays. This option allows you to show or hide them.


