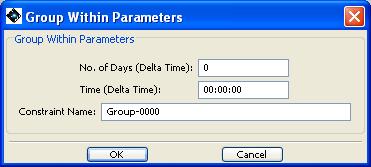
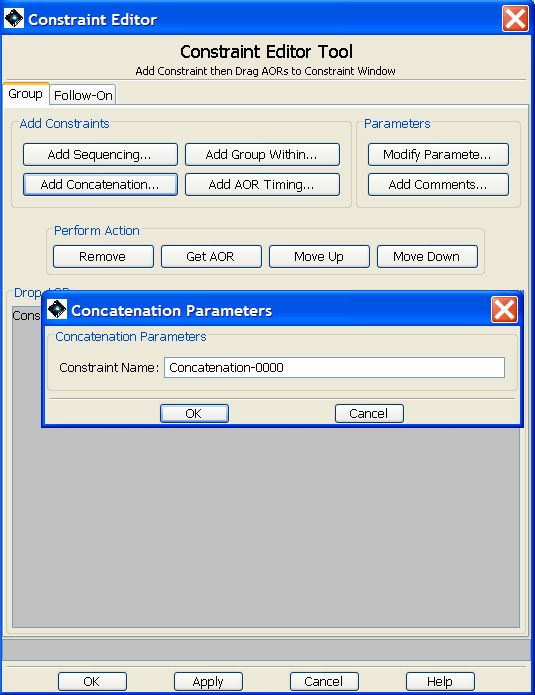
You may create 3 types of grouping constraints: "Sequence", "Chain", and "Group Within" using the "Group/Follow-On Constraints" tool available under the "Tools" menu of HSpot (Figure 16.4, “Constraint editor”).
Sequence: An ordered, interruptible group. The AORs will be executed in the order specified and a maximum period of time in which all the observations in the sequence should be completed is specified (the Delta Time). The sequence constraint should only be used when the science requires sequential ordering of the AORs.
Creating a sequence may be useful when, for example, you require both a line and a continuum measurement to make a particular observation and you cannot reduce the former without the latter. In this case it makes sense to request that the continuum measure be made first and that the line measurement only be made afterwards. This means that when the line observation is made, it will be possible to reduce it immediately because the required supplementary data is already available to you.
Although you can, if you wish, constrain as tightly as required the time limit for making the observations (the Delta Time), expressed in days and hours from the first observation, it is perfectly acceptable to define a very large Delta Time; this simply means "at any point within the duration of the mission" if you are in no particular hurry to receive the data, or, for example, 365 days, in other words "within one year of the first observation".
Chain: An ordered, non-interruptible group, also known as a "Concatenation". The AORs will be executed in the order specified with NO interruptions in the chain. If you chain together AORs, you must ensure that the chain does not exceed the maximum allowable duration for a single AOR (18 hours). HSpot will warn you if your chain is too long. It will show you the total time in the chain in the "Constraints" window.
Note that although the AORs will be executed one after another in the exact sequence that you have defined, the chain may be executed at any moment during the mission. If it is essential that it be executed at a particular time, you should create the concatenation and then add a timing constraint to it.
Group Within: A group of AORs executed within a specific length of time, but with no particular starting date/time constraint. Once the first AOR has been executed, the rest of the AORs in the group will begin within the specified time interval. They may be executed in any order within the time interval.
Again, you simply define a Delta Time in days. If, for example, you define 365 days, all the observations will be completed within a maximum of one year from the execution of the first observation, but in no particular sequence.
An alternative type of sequencing is the "Follow-On constraint". For the Mission Planning System a Follow-On is defined as follows:
![[Warning]](../../admonitions/warning.gif) | Warning |
|---|---|
| If you "Sequence" or "Group within" observations, the 600s overhead will be applied to all of the AORs, not just to the first AOR in the sequence. This makes this option less attractive for AORs of short duration. |
Execute the "follow-on" AOR(s) within the specified range of time after a particular AOR has been executed.
An example of a follow-on constraint is discussed in Section 16.4.4, “Creating New Grouping and Follow-On Constraints ”. In this case you select the AOR that will be executed first and then the range of time - days and hours - after execution of this AOR has ended when the next observation should be carried out. This is particularly useful for sporadic observations of a particular variable target over a period of days, weeks, or months.
When defining a timing constraint you are required to enter a Delta Time. This may be a single time when you are "sequencing" or "grouping within", or two times, when you are defining a "Follow-On", or stating that you want an observation carried out before or after a certain time.
There are two Delta Time fields -- days and hours:minutes:seconds. You may fill in a value for one or both of them. Suppose you want to define an interval of one year; in this case you just fill in 365 in the "days" field. If, in contrast, you want the interval, the Delta Time, to be 6 hours (so the next observation starts six hours after the previous one has ended), you leave the days field as zero and fill in 6 hours (06:00:00) in the hours field. To define a Delta Time of a day and a half you would define the interval as 1 day in the days field and 12 hours (12:00:00) in the hours field.
Where you are required to give a start and end time you must fill in the Delta Time field(s) to limit range of times within which you wish to carry out the observation. So, to define that the Follow-On observation must be executed no less than seven and a half days after the previous observation has ended, but no more than eighteen days, you would fill in "7" in the "Days (start)" field and "12:00:00" in the "Time (start)" field and then "18" in the "Days (end)" field.
From the point of view of Mission Planning, a concatenation effectively blocks several AORs for a target into a single observation, thus avoiding the need to make additional telescope slews. This makes Mission Planning more efficient and is thus rewarded by having a reduced overhead on the observation.
For example, if you wish to take four spectra of a particular object with PACS - e.g. two SED scans, a line observation and a continuum observation - it is far more efficient to group all the observations together into a single block of observing time. HSpot will then charge the slew overhead of 180 seconds once, rather than four times, saving the observer 540 seconds of observing time, which he or she can use for other, additional observations.
A second example is when you wish to observe in SPIRE PACS Parallel Mode taking, as recommended, normal and orthogonal scans to reduce the 1/f noise: it is more efficient to concatenate the two scans, provided that they sum is no more than 18 hours of observing time and the map centre is the same in both directions, as the observations will only be charged one overhead of 180 seconds, rather than two.
A third, very common case, is when you wish to observe in all three PACS bands. PACS will observe simultaneously in the 60-85 micron and, either the 85-130, or the 130-210 micron band. If you wish to observe in all three bands, you should define two AORs, one specifying the 60-85 and the 85-130 micron bands and the other the 60-85 and the 130-210 micron bands and concatenate the observations.
Another example of concatenation as a useful tool is when you wish to take a flux curve following a single object over a period of time, for example, the strength of a particular water line in a comet over several hours of HIFI observations. The most efficient way to do this is to define a series of AORs and concatenate them to give a series of observations of the required length. This means that you will only be charged one slew overhead and will be guaranteed a continuous, unbroken sequence of observations.
We have built several checks into HSpot to prevent the creation of grouping constraints that are impossible to schedule. If you have questions about constraints, please see the Herschel Observatory Manual and Herschel Policy and Proceedures documents for more information. If you are still in doubt, send a message to the Helpdesk (http://herschel.esac.esa.int/esupport/). Guidelines for groups that are and are not allowed are:
- Things that are permitted in concatenated observations. The concatenation must satisfy both the targeting and instrument grouping conditions:
A.) Permitted targeting groupings
Two or more observations of the same target.
- Two or more different, fixed targets within a one degree radius can be combined in a single chain.
- Two or more satellites of the same planet can be combined in a single chain.
B.) Permitted instrument groupings
PACS line spectroscopy and range spectroscopy (PSpecL and PSpecR) can be grouped in a single chain.
- HIFI Point Source, Map and Spectral Scan modes (HPoint, HMap and HScan) can be combined in a single chain
- Things that are NOT permitted in concatenated observations.
Herschel operates only one instrument at a time and it takes a finite amount of time (sometimes several hours) to switch from one instrument to another. HSpot will prevent you from chaining AORs from different instruments.
PACS spectrometer and PACS photometer are counted as different instruments and are scheduled separately.
Idem for SPIRE spectrometer and SPIRE photometer.
Changes in HIFI mixer band take time to carry out and thus are inefficient. The smallest possible number will be scheduled on any observing day -- usually an absolute maximum of 3, although ideally no changes will be made during a day unless absolutely necessary. For this reason, observations with different HIFI bands cannot be concatenated.
Fixed and moving targets cannot be mixed in a single chain.
- Save in the specific case given above, two different moving targets cannot be concatenated as HSpot has no way of knowing if, for a given date, both objects will even be visible simultaneously and even less if they will satisfy the requirement that they be within a 1 degree radius.
The maximum allowable duration for a non-interruptible group (chain) of AORs is 18 hours. HSpot will show you the total duration in your chained AORs and will only permit a chaining if the total length of the chain is under 18 hours.
If you create a "Group Within" constraint, check that the sum of the AOR durations in the constraint does not exceed the time period specified in the constraint. HSpot will warn you if it does (i.e. please do not ask HSpot to group AORs summing 10 hours within a period of 8 hours, as it cannot be done!).
To create a new constraint, select "Group/Follow-On Constraints" from the "Tools" menu. This opens the "Constraint Editor Tool" dialogue shown in Figure 16.4, “Constraint editor”. To add a new grouping constraint, you click on the "Add Sequencing", "Add Chaining", "Add Group-Within", or "Add Follow On".
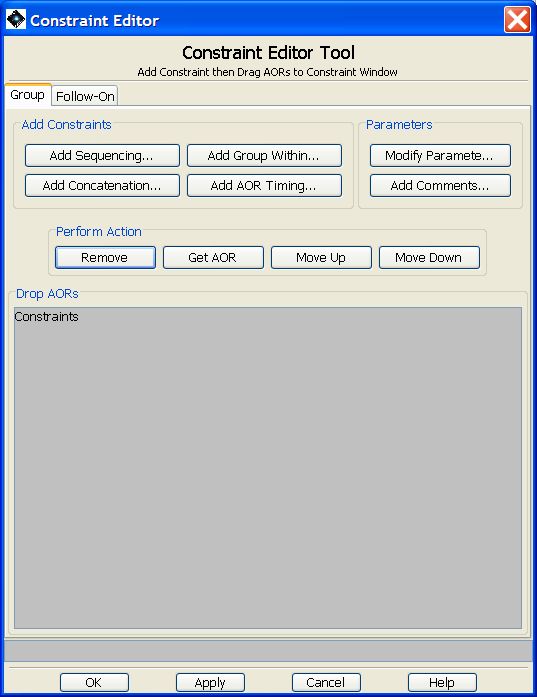
Figure 16.4. The Constraint Editor dialogue is the tool used to add grouping and follow-on constraints.
If you choose to add a new Sequence constraint, HSpot opens the dialogue shown in Figure 16.5, “Editing a sequence constraint” with the default name "Sequence-0000". Enter the time period in which the AORs in the sequence must be completed. You may also change the constraint name in this dialogue.
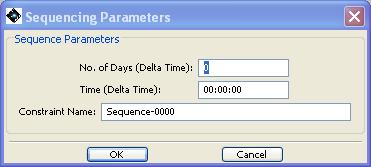
Figure 16.5. The dialogue for creating a Sequence constraint, an ordered interruptible group. This is opened from the Add Sequencing button in the constraint editor dialogue.
HSpot uses the name for each constraint to identify it and lists the constraints by name when you write out your AOR file. If you selected "Chain" (concatenation) or "Group-Within" constraints instead of "Sequence", HSpot will open the dialogues shown in Figure 16.6, “Creating a chain constraint” and Figure 16.7, “Creating a group within constraint”, respectively. When you click "OK", HSpot adds the newly created constraint to the "Constraint Editor Tool" dialogue, shown in Figure 16.8, “Completed addition of constraints”. If you close the Constraint Editor Tool without linking any AORs to the constraints, HSpot will not save the constraints in memory.
After creating the Sequence, Chain, or Group Within constraint, you are ready to specify which AORs are included in this constraint. There are two methods for doing this:
Drag-and-drop: Click on the desired AOR in the main AOR table and keep the mouse button pressed, drag your cursor to the appropriate constraint name in the constraints dialogue, and release the cursor to add the AOR to the constraint. Repeat this process to add additional AORs.
Get AOR button: First click on the constraint to which you want to add AORs. Next, in the AOR table, click on the AOR you want to link to the constraint. Then click the "Get AOR" button in the "Perform Actions" section of the constraints dialogue (see Figure 16.9, “Linking AORs to a sequence constraint”) to add the AOR to the constraint. Repeat the process to link additional AORs to the constraint.
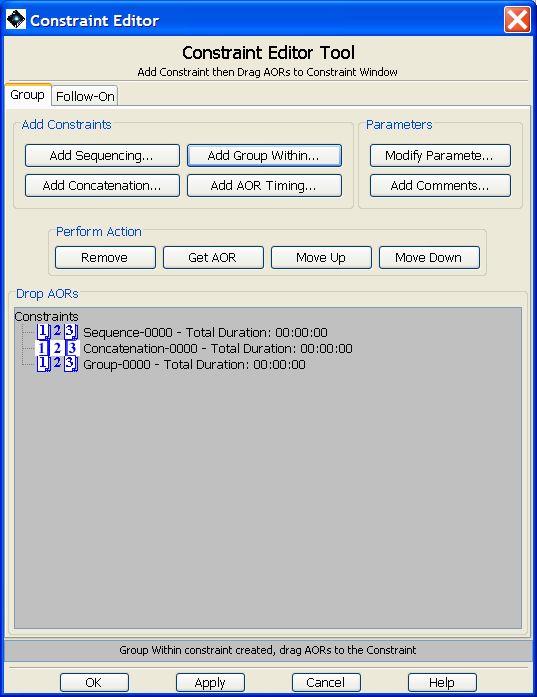
Figure 16.8. The constraint editor dialogue with 3 new constraints added. No AORs have been linked to these constraints yet.
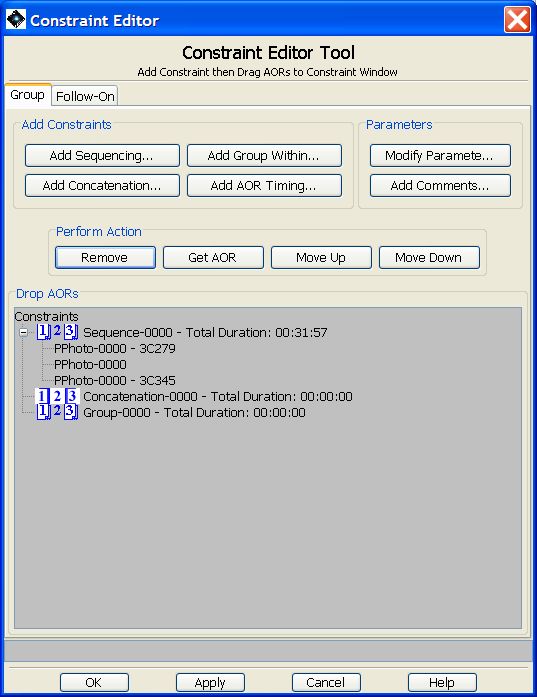
Figure 16.9. After linking four AORs to the Sequence-0000 constraint, the constraint editor will look like this. You can manipulate the order of the AORs by selecting one and using the "Perform Action" buttons to remove the AOR, or to move it up or down in the order.
After linking four AORs to the Sequence-0000 constraint the constraint dialogue will look like Figure 16.9, “Linking AORs to a sequence constraint”.
After clicking "OK", the constraint appears in the observations listing on the right side of the screen. A checked box appears next on the AOR line under the column headed "G" (for a Group constraint -- see Figure 16.10, “Indication of constraint on AOR”).
Follow-On observations allow a target to be monitored over a period of time typically much longer than one day, for example, once a week during an observing window, or once each observing window throughout the mission. The interval between observations can be fixed (a severe constraint on telescope scheduling), or flexible (strongly recommended). The example below shows you how to define a series of AORs that are both chained and spaced as Follow-On.
![[Warning]](../../admonitions/warning.gif) | Warning |
|---|---|
Long-term Mission Planning will follow a cycle of scheduling of instruments that allows their most efficient use and maximising the duration of the on-board cryogenic supply. For the first year and a half of the mission at least this will be done with a 28 day cycle. This means that each instrument, or AOT, will be blocked for a certain number of days every 28 days. The number of days that an instrument is scheduled in each block will be determined by the percentage of observing time in accepted observations for that instrument (i.e. if 35% of the total time awarded is for a particular instrument or AOT, it will, in principal, be blocked for 10 days every 28 although, due to the need for cooler recyclings every 2 days, SPIRE photometer observations will scheduled in blocks of an even number of days to avoid wasting re-cyclings, while the longer hold time of PACS allows block that are a multiple of 3-days to be used - in this case, the second half of the third day will be used for spectroscopy as the cooler hold time is approximately 2.5 days for PACS photometry). You are thus strongly recommended not to overconstrain the intervals between observations as it may make it impossible to schedule them following the standard instrumental cycle. Where a tight constraints on the intervals between observations are essential, these must be carefully justified in your proposal, as they will require special handling by Mission Planning and may be highlighted as a potential problem with a proposal when it is subject to technical review. As a rule of thumb, when you define the range of time for the follow-up, i.e. between "x" and "y" days after the previous observation, x+y should sum more than 21 for the easiest scheduling. |
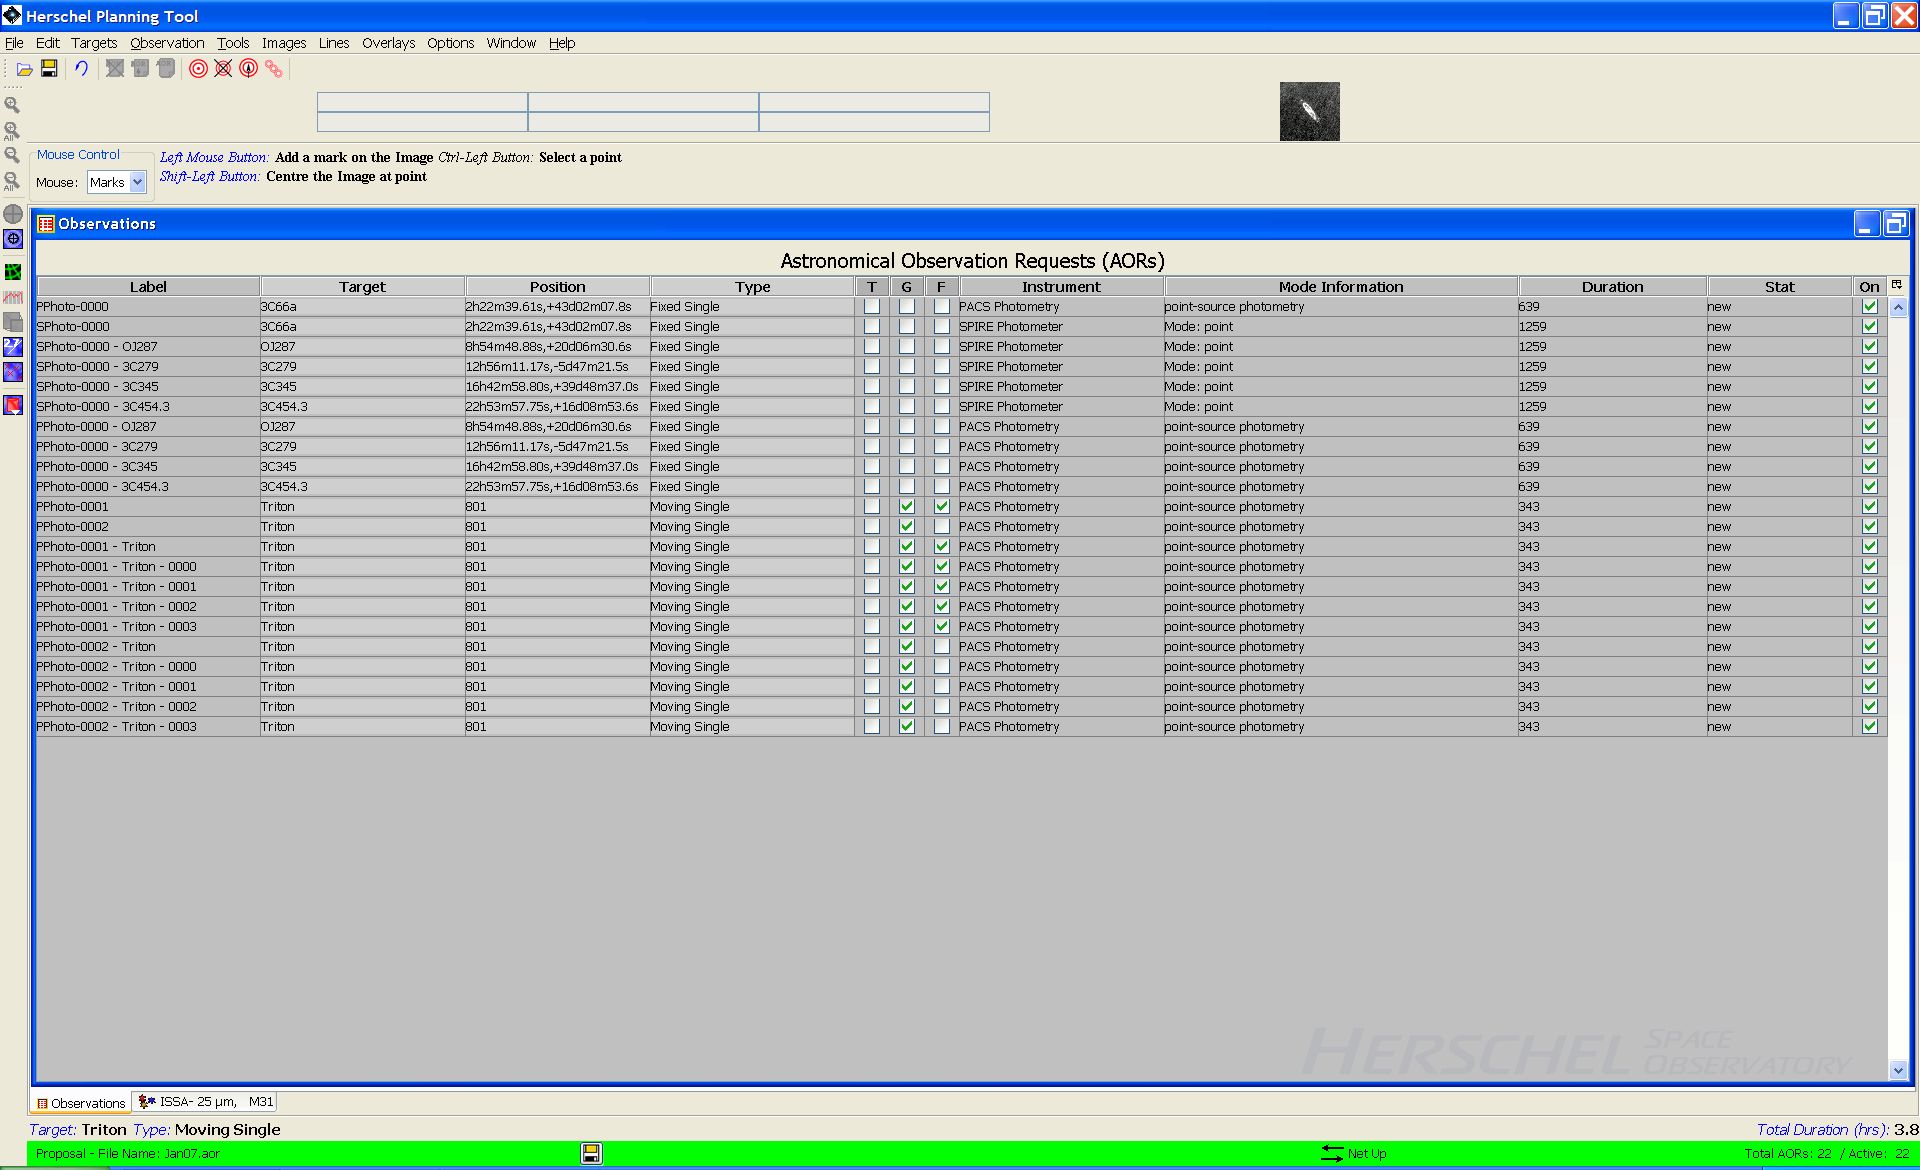
In this example, a series of PACS photometry AORs of Neptune's satellite Triton have been defined. PACS has three bands, only two of which can be observed simultaneously, so two AORs are defined to allow all three bands to be observed (PPhoto-0001 and PPhoto-0002), which are each then replicated five times to give a series of 6 observations of each AOR (Figure 16.11, “The starting point for a Follow-On observation. Define the AORs.”). On each occasion we wish to chain the observations in the two bands to define a total of 6 individual observations and then spread these 6 observations over the course of a single observing window to allow us to monitor the object over a period of approximately 60 days. Note that this example is not consistent with the Mission Planning rules defined above and would be flagged in a Technical Review of proposals: only if there would a particularly strong scientific justification would the Mission Planning rules be overridden.
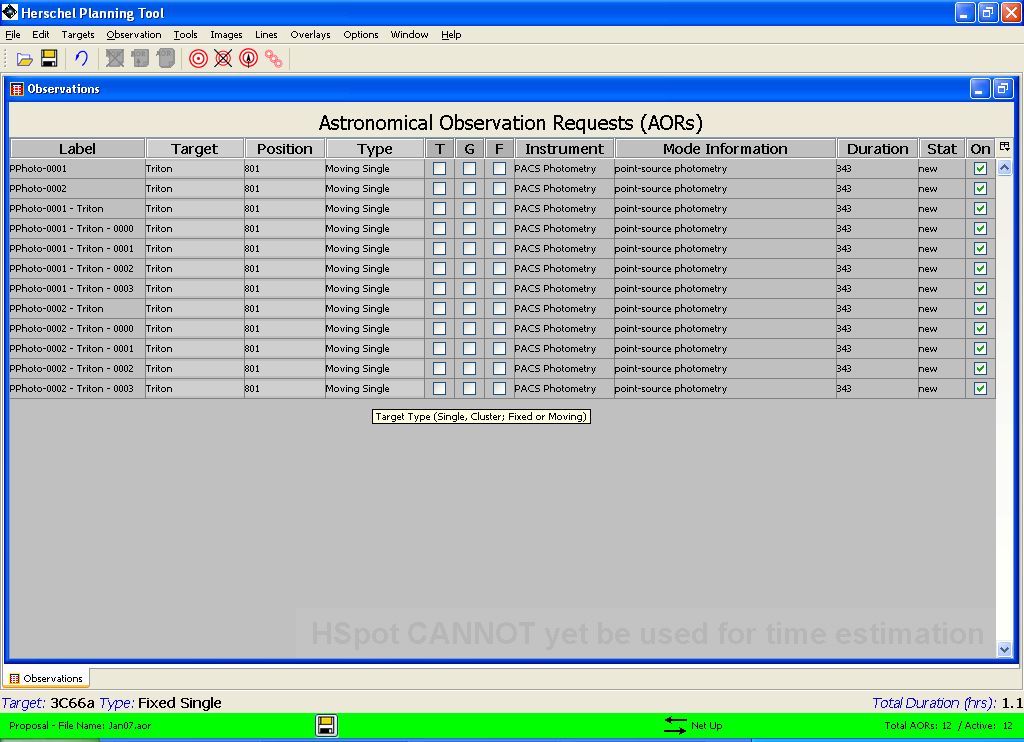
Figure 16.11. Two PACS photometry AORs to observe the 60-85 and 85-130 micron windows are defined (PPhoto-0001 and PPhoto-0002). These are then replicated to give a total of six observations of each AOR which we wish to spread out over a visibility window.
These observations are first chained and then the Follow-On defined. Note that the "T", "G" and "F" columns are initially blank as no constraint has yet been added.
Go to the "Group/Follow-On Constraints..." option of the "Tools" menu. Select the "Group" tab and then "Add Concatanation..." as shown in Figure 16.12, “Defining a chain. Define the AORs.”.
HSpot will open the concatenation with a default name as shown in Figure 16.13, “Constraint Editor Tool open for concatenation.”. Unless you have a particular reason to change the name, for example, to make the names for your concatenations more descriptive of their content, you can accept the default name. You should now select the AORs that you wish to chain and drag them across, one by one.
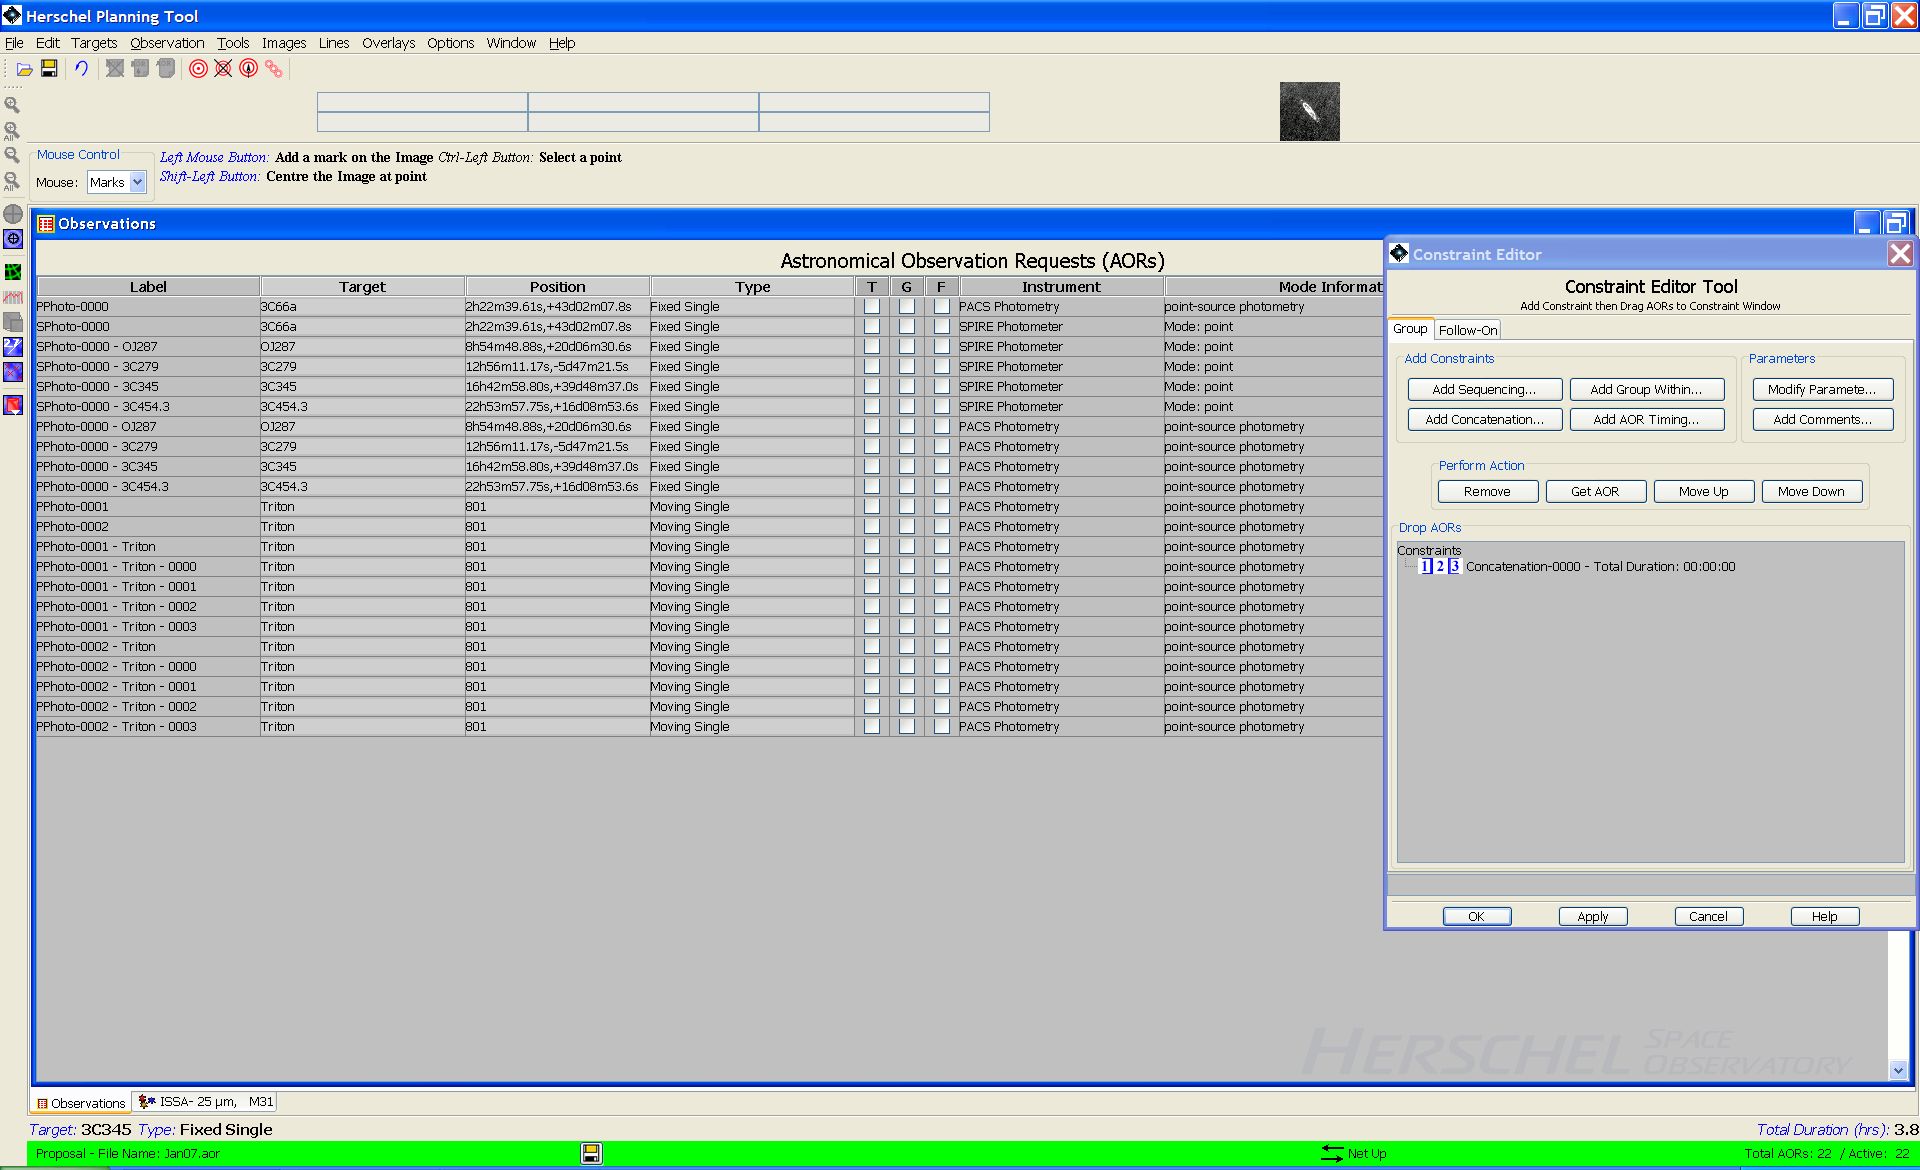
Figure 16.13. The Constraint Editor Tool open to receive AORs that are dragged across to define a concatenation.
When both AORs have been dragged across and added, close the chain and start a new one by selecting "Add Concatenation..." again. HSpot will increase the concatenation number sequentially. Accept the new name and drag across the next two AORs to define the second chain, as shown in Figure 16.14, “Constraint Editor Tool open for concatenation.”.
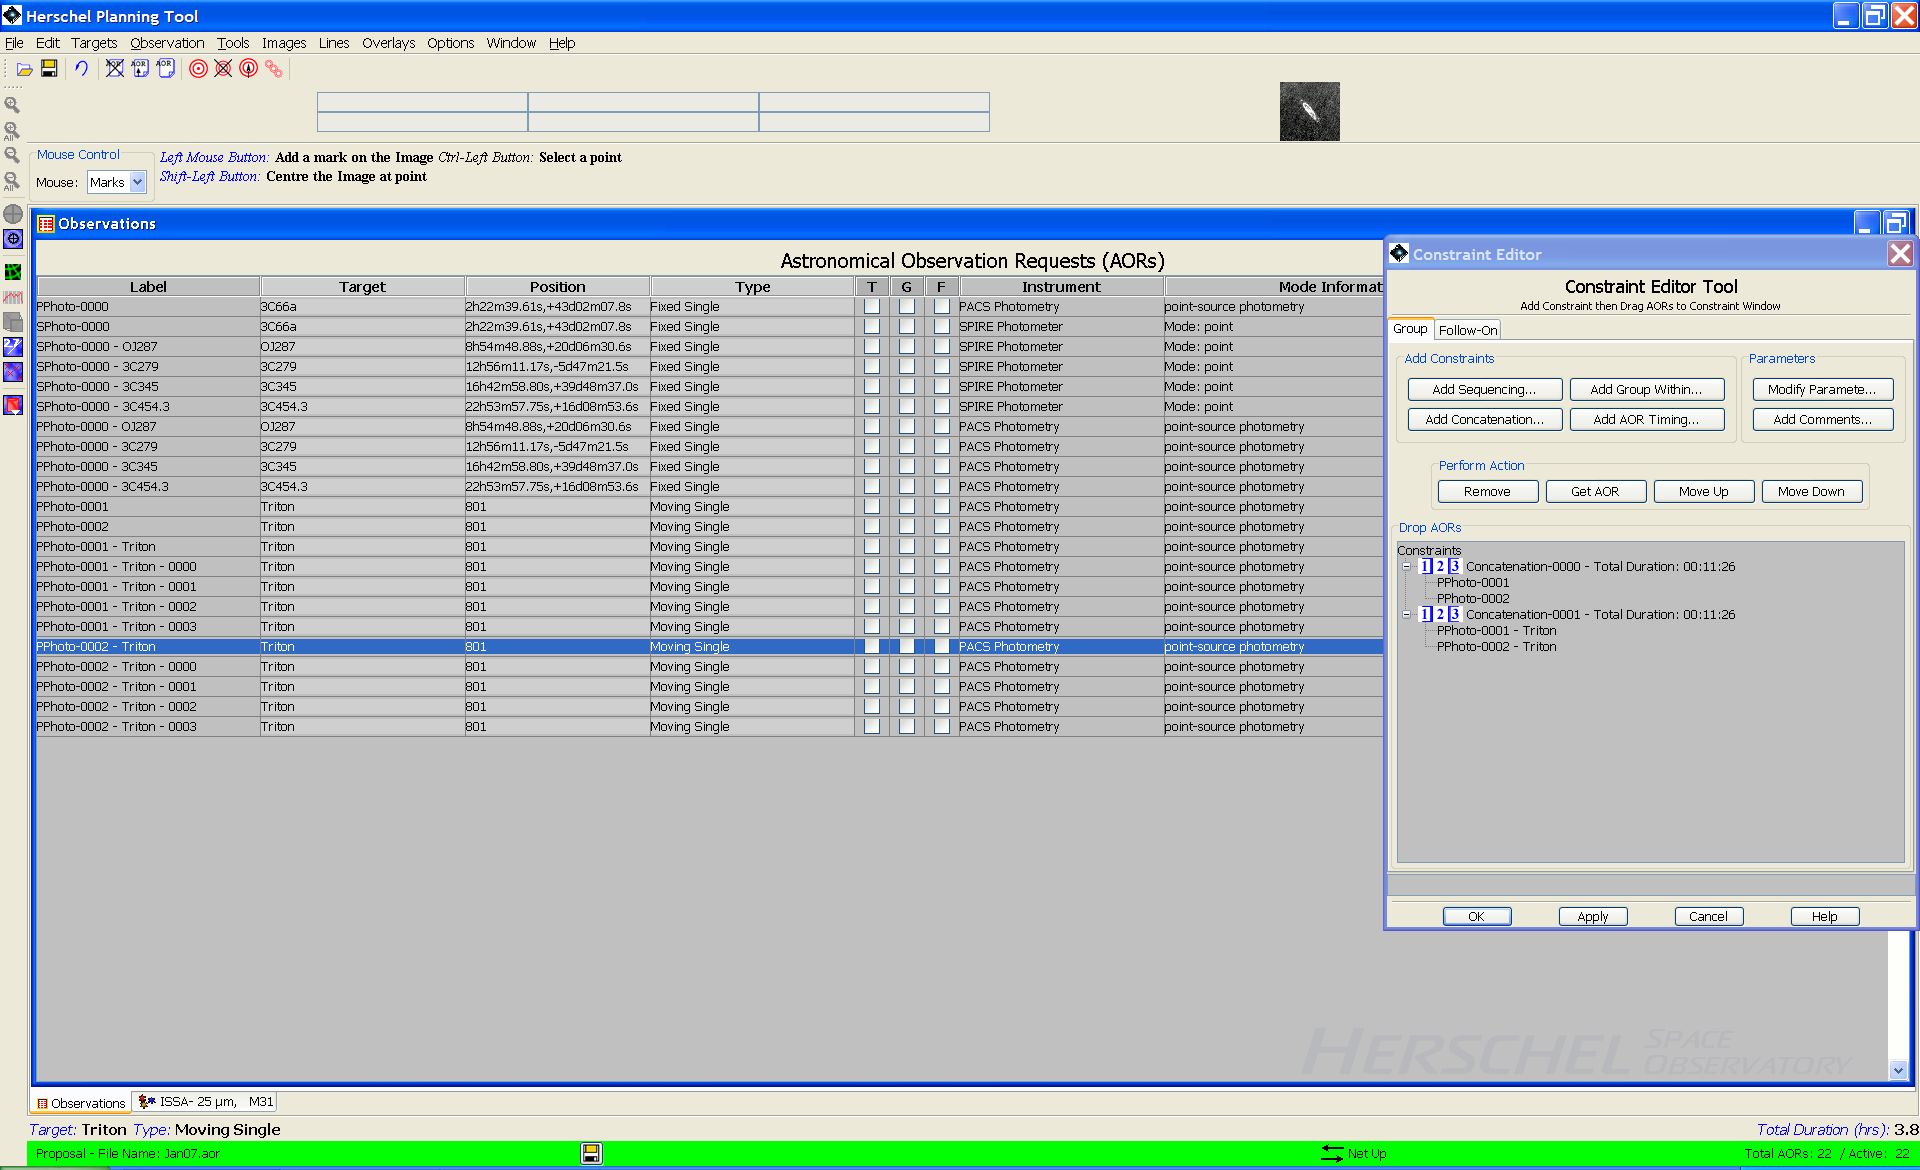
Figure 16.14. The Constraint Editor Tool open to receive AORs that are dragged across to define a concatenation.
Continue creating concatenations and dragging the AORs across until all the chains have been defined, as shown in Figure 16.15, “Constraint Editor Tool at the end of the concatenation definition.”. Now press "Apply" for HSpot to add these concatenations to the AORs that you have defined. If you make a mistake, you can highlight an AOR or chain in the Constraint Editor Tool window and press "Remove" to erase it. Other buttons allow you to change the sequence of observations, if required. Press "OK" to close the Constraint Editor Tool window.
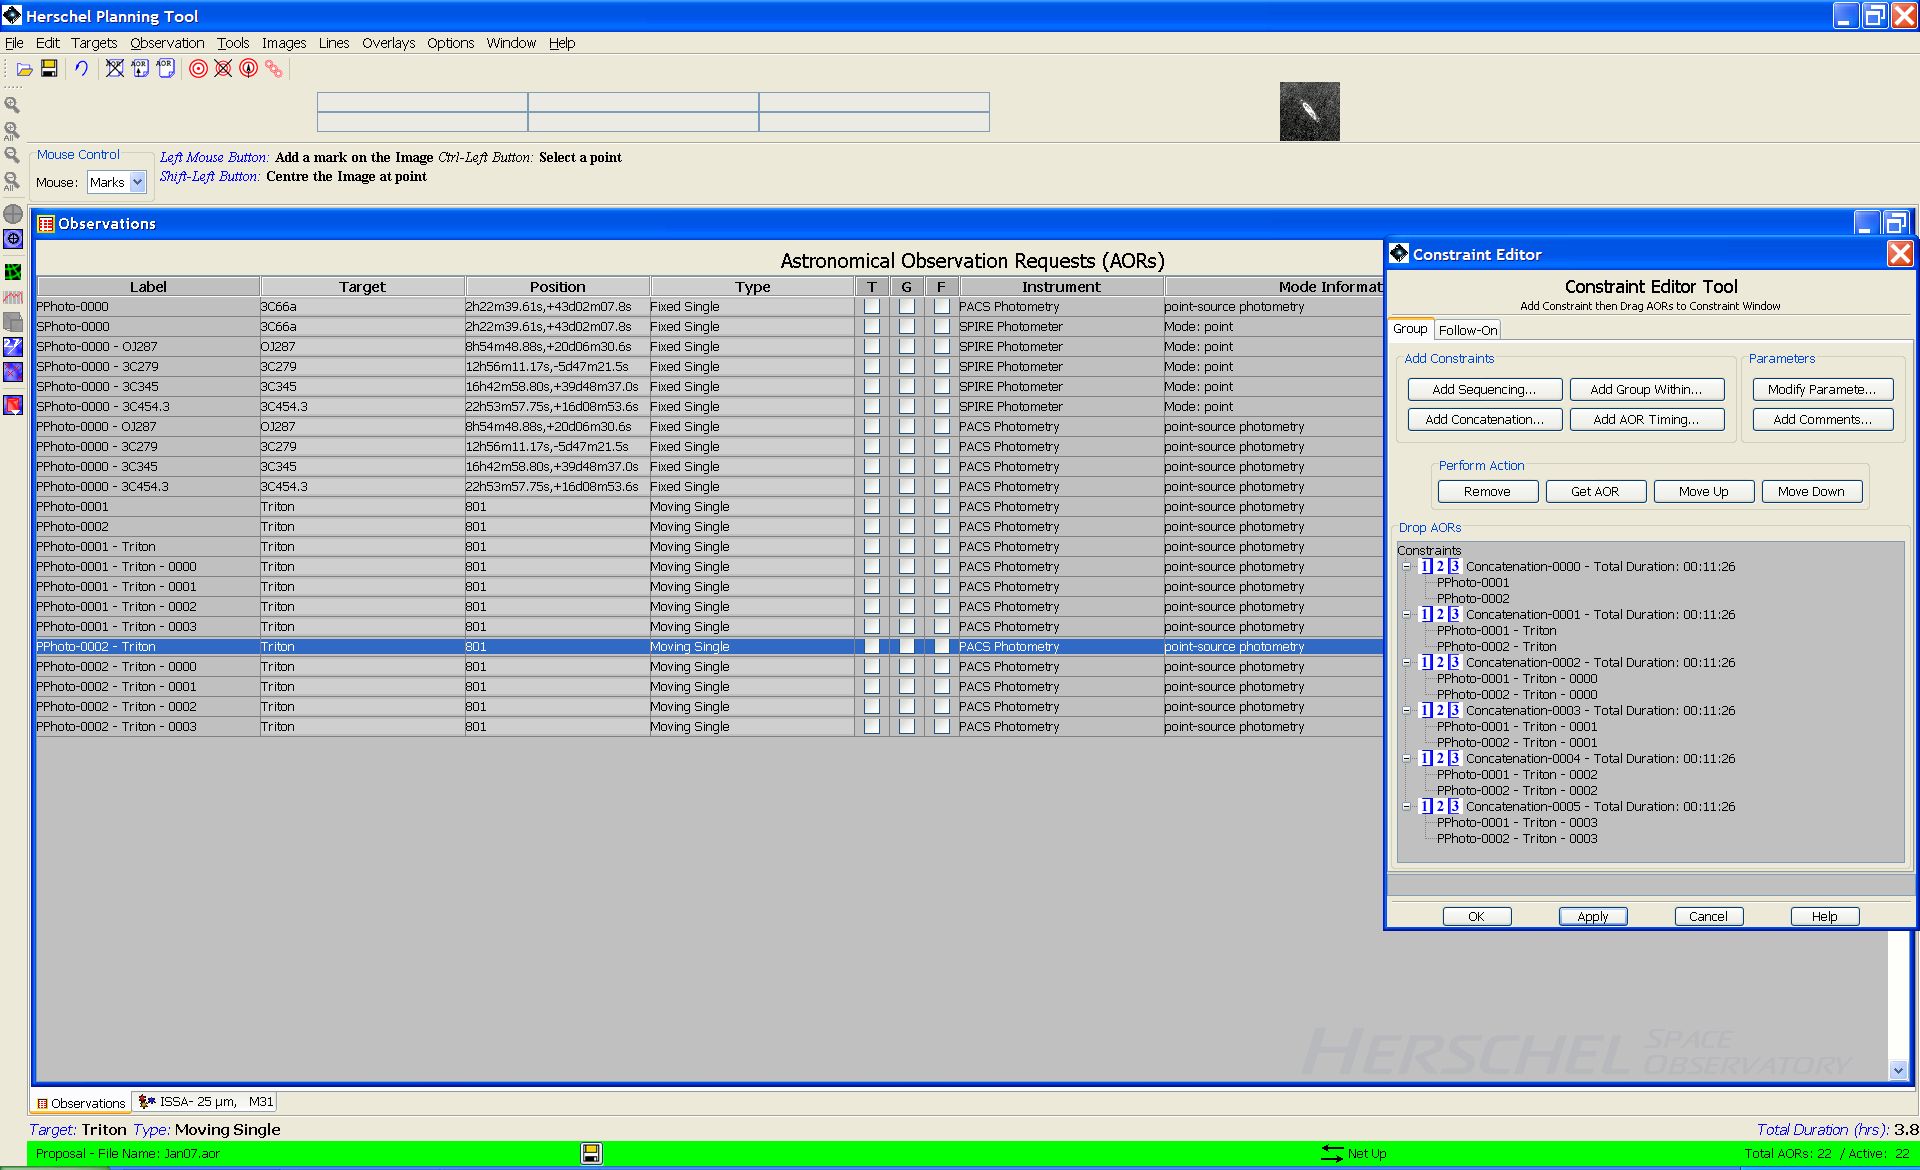
Figure 16.15. The Constraint Editor Tool when all six concatenations have been defined. Press "Apply" for these to be accepted by HSpot.
On pressing "Apply" all the chained AORs will be flagged in the "G" (Group) column to show that the constraint has been applied, as shown in Figure 16.16, “The AOR main window showing grouping flagging.”.
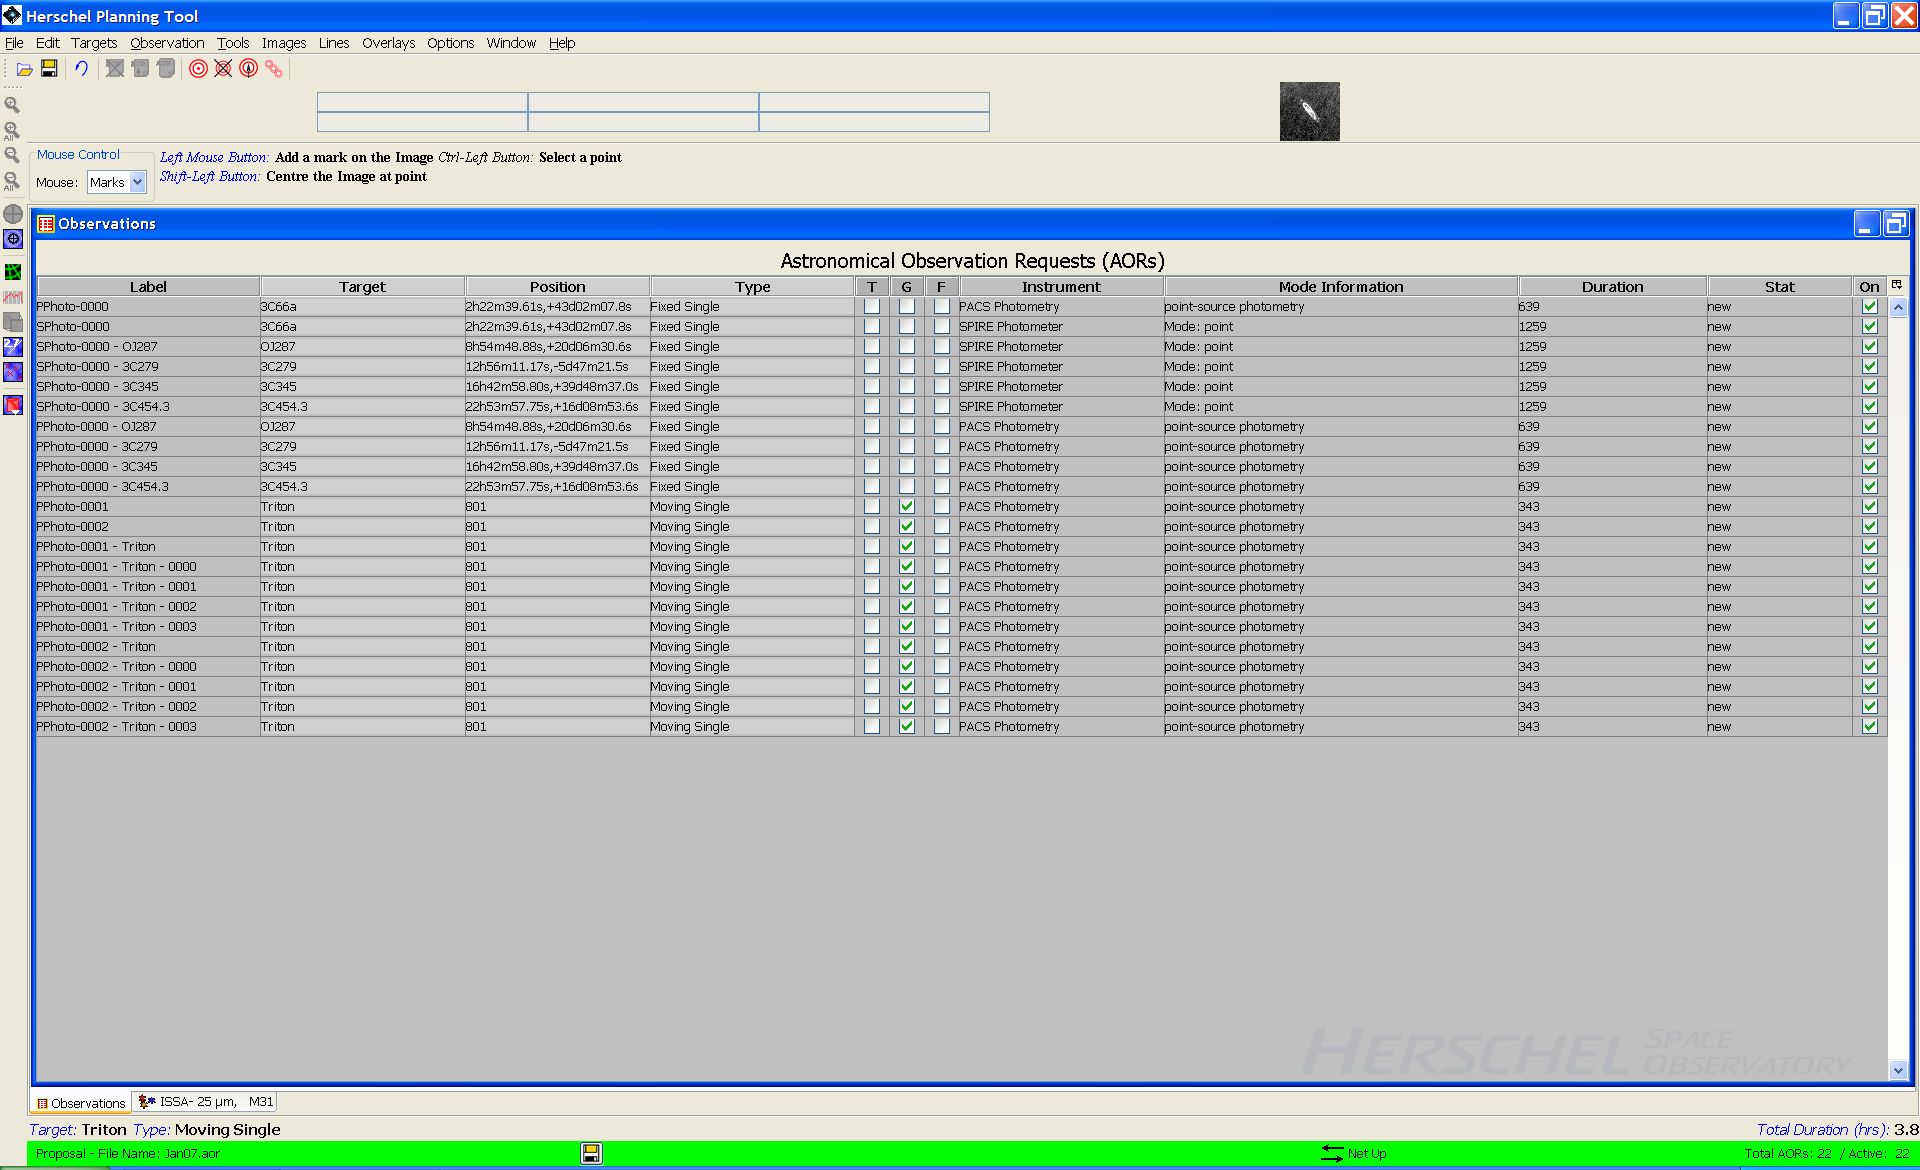
Figure 16.16. The AOR main window when all six concatenations have been defined. All the AORs are flagged in the "G" (Group) column to show that a grouping constraint has been applied.
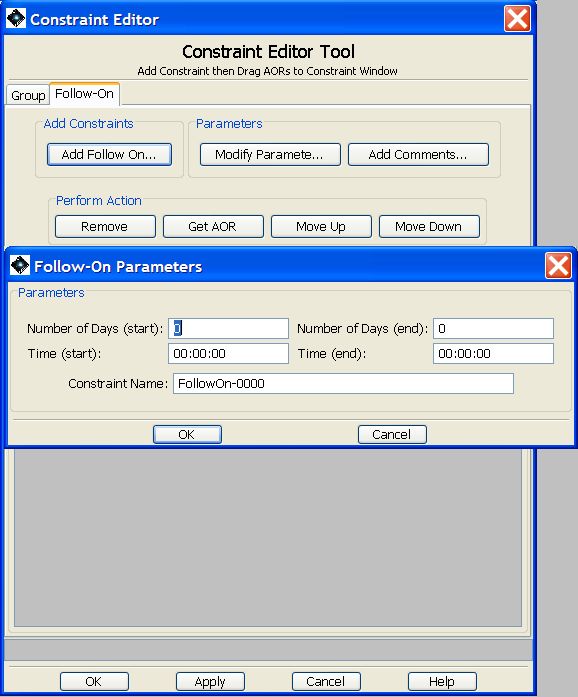
Now we wish to define the Follow-On so that the chains will be observed sequentially at regular intervals. Again, go to the "Group/Follow-On Constraints..." option of the "Tools" menu. Select the "Follow-On" tab and then "Add Follow On...". A pop-up will appear as shown in Figure 16.17, “The Follow-On parameters window.” asking us to define the parameters for the Follow-On.
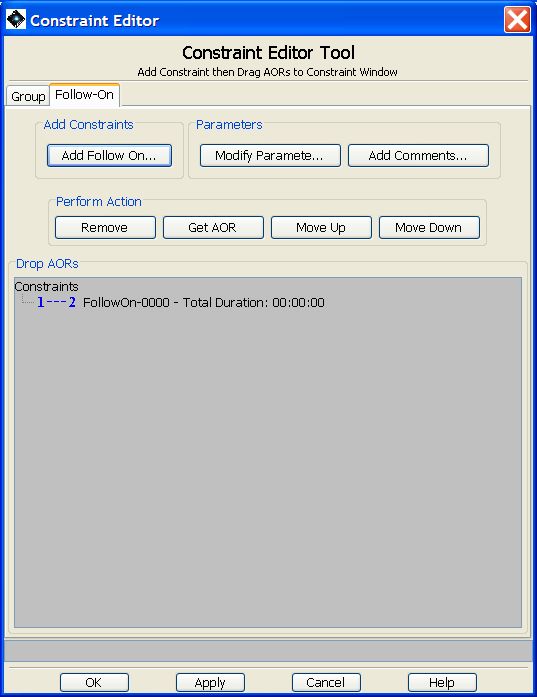
The most strictly we constrain the observations, the more difficult it will be for the Mission Planning software to accomodate them. In this case we request that the observations be carried out at intervals between 8 and 12 days after the previous observation has ended (NB: this would be marginal for scheduling purposes with the present Mission Planning rules; an even less constrained range would be preferable), as shown in Figure 16.18, “The Follow-On parameters window.”. Click on "OK" to accept the parameters. A Follow-On will be added to the Constraint Editor Tool window, as shown in Figure 16.19, “The Constraint Editor Tool window with a Follow-On defined.”.
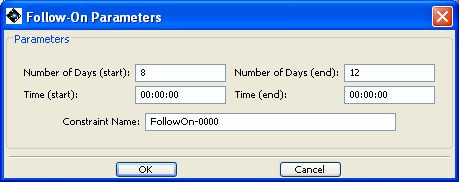
Figure 16.18. The window to define the Follow-On parameters for Follow-On observations. In this case the window for execution is defined to be between 8 and 12 days after the previous AOR has ended.
We must now drag and add the AORs across to the Follow-On. However, as we have already concatenated the pairs of observations, we must only add the first AOR of each chain, as shown in Figure 16.20, “The Follow-On parameters window.”. If we try to link both AORs of a chain, HSpot will give an error and refuse to accept the second AOR as valid.
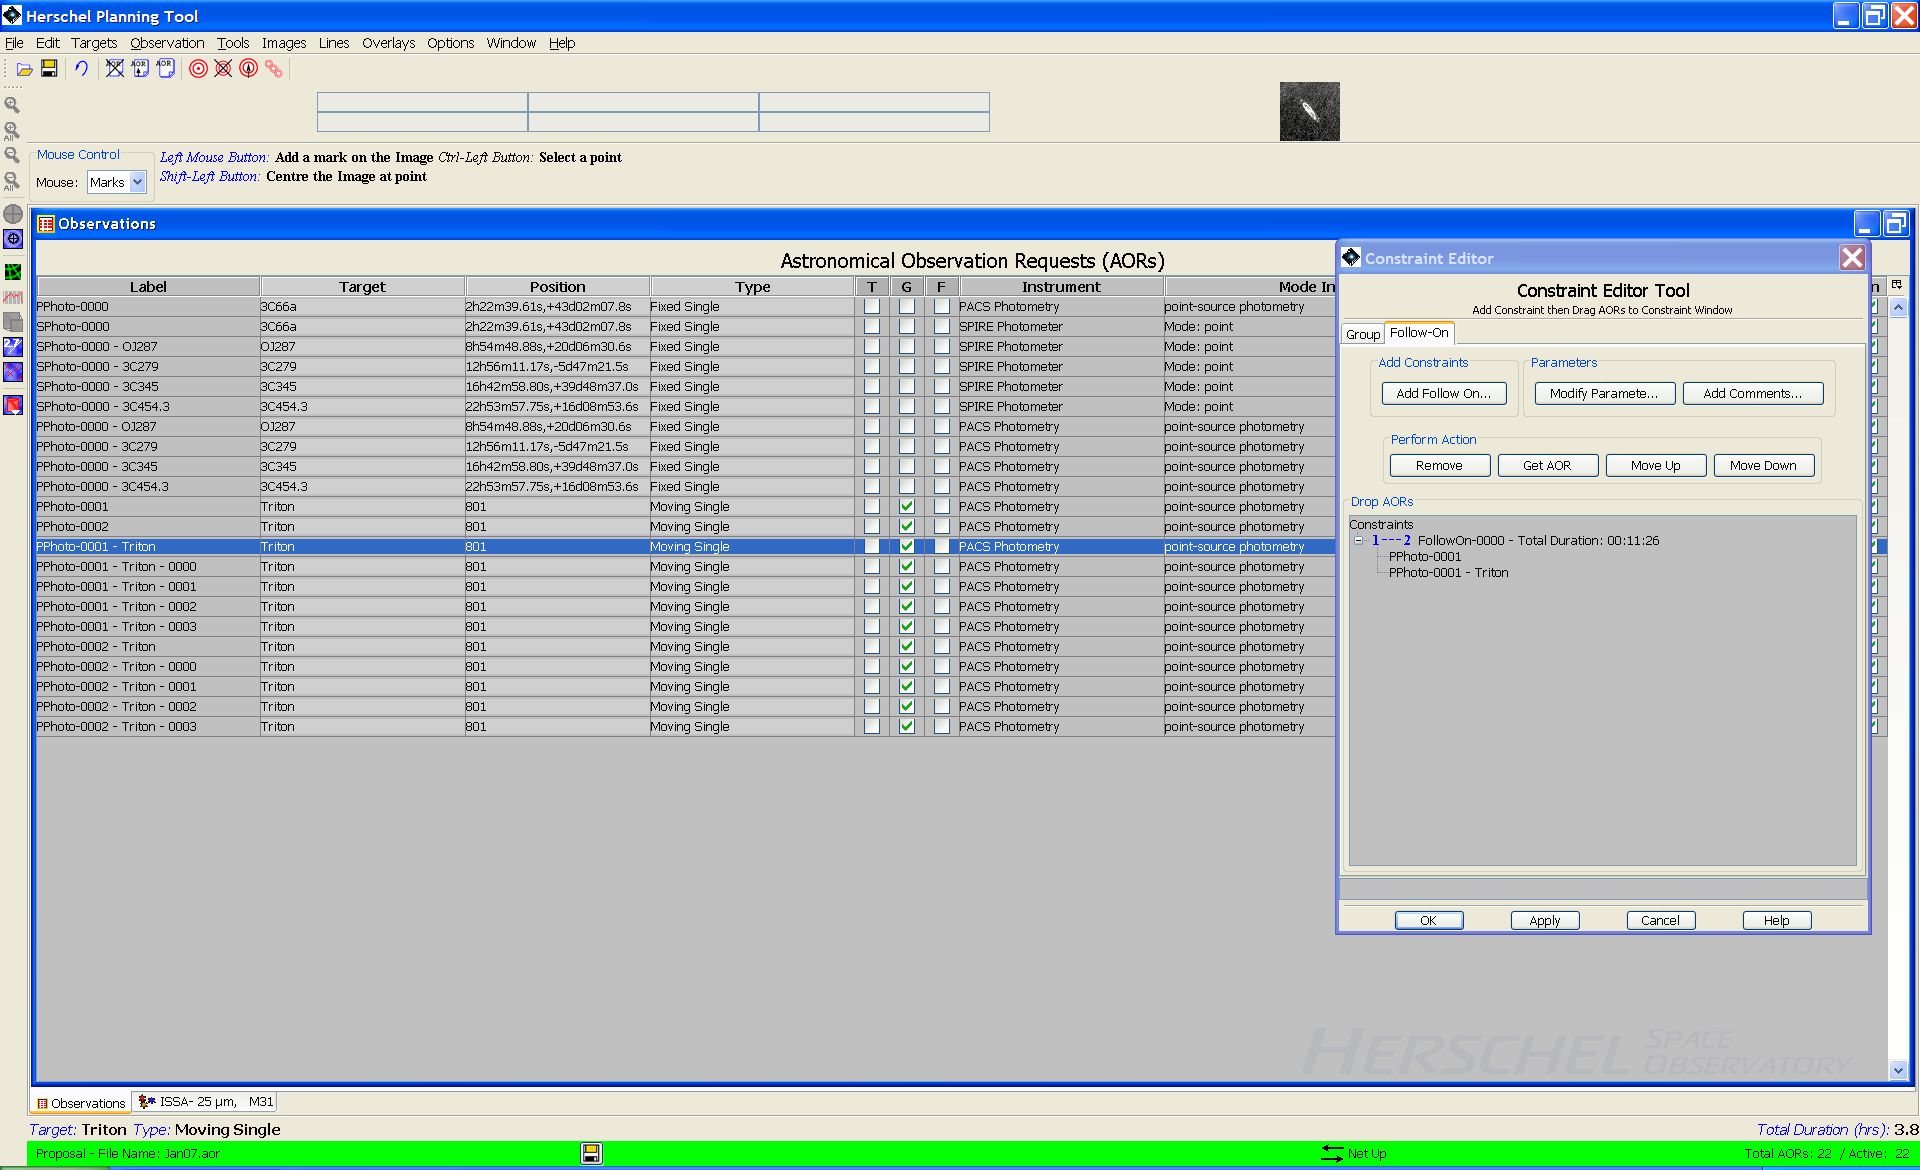
Figure 16.20. Definition of the first Follow-On. As we are Following-Up with concatenated observations, only the first AOR in each chain should be added. Attempting to add both AORs in a chain will give an error.
We now create the second Follow-On. This can have the same interval or a different one as required by circumstances. Here, we link the second AOR of the first Follow-On with the next AOR that we wish to observe in the sequence, as shown in Figure 16.21, “The Follow-On parameters window.”.
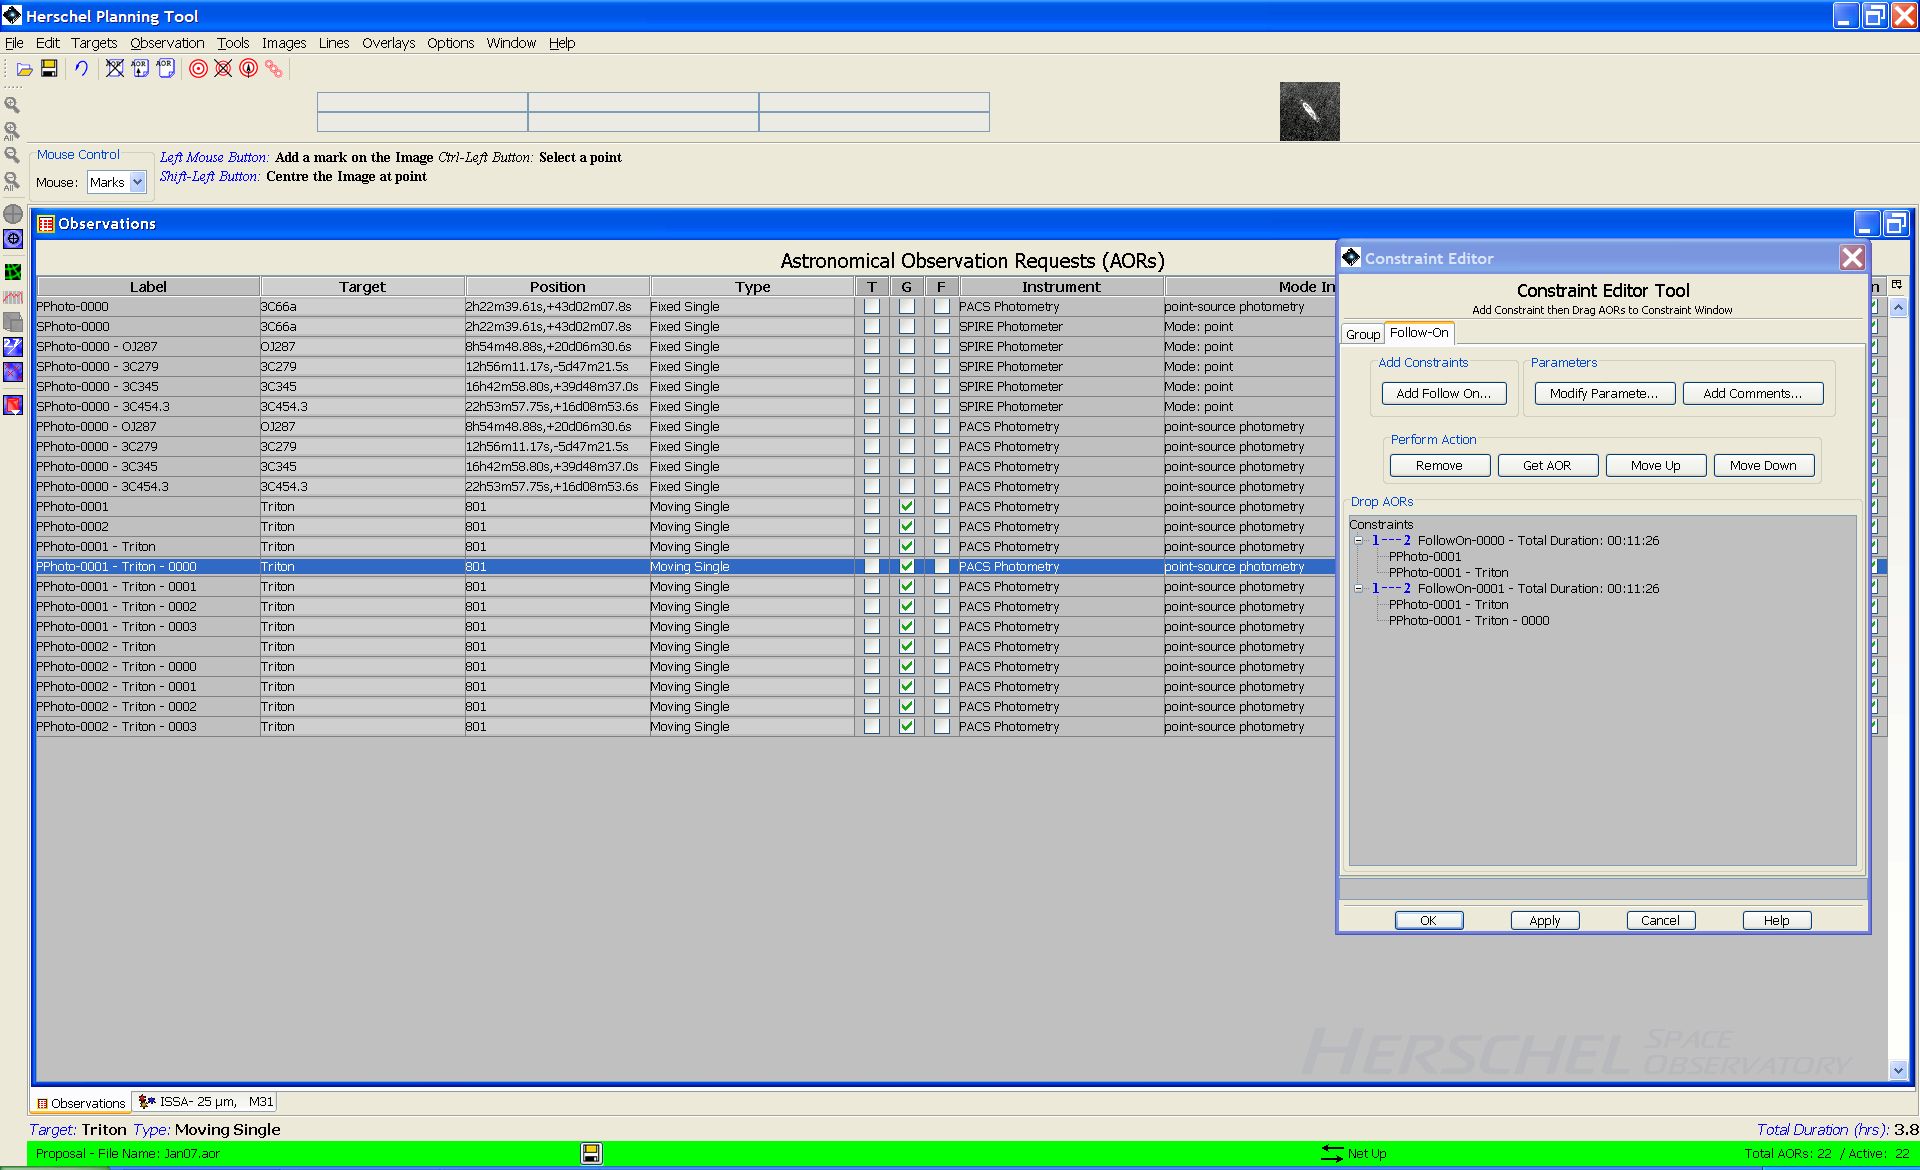
Figure 16.21. Definition of the second Follow-On. We now link the second AOR in the previous Follow-On to the next AOR in the table.
We continue creating Follow-Ons, linking the second AOR of the previous Follow-On and the next AOR in the sequence to be observed, as shown in Figure 16.22, “The Follow-On sequence.”.
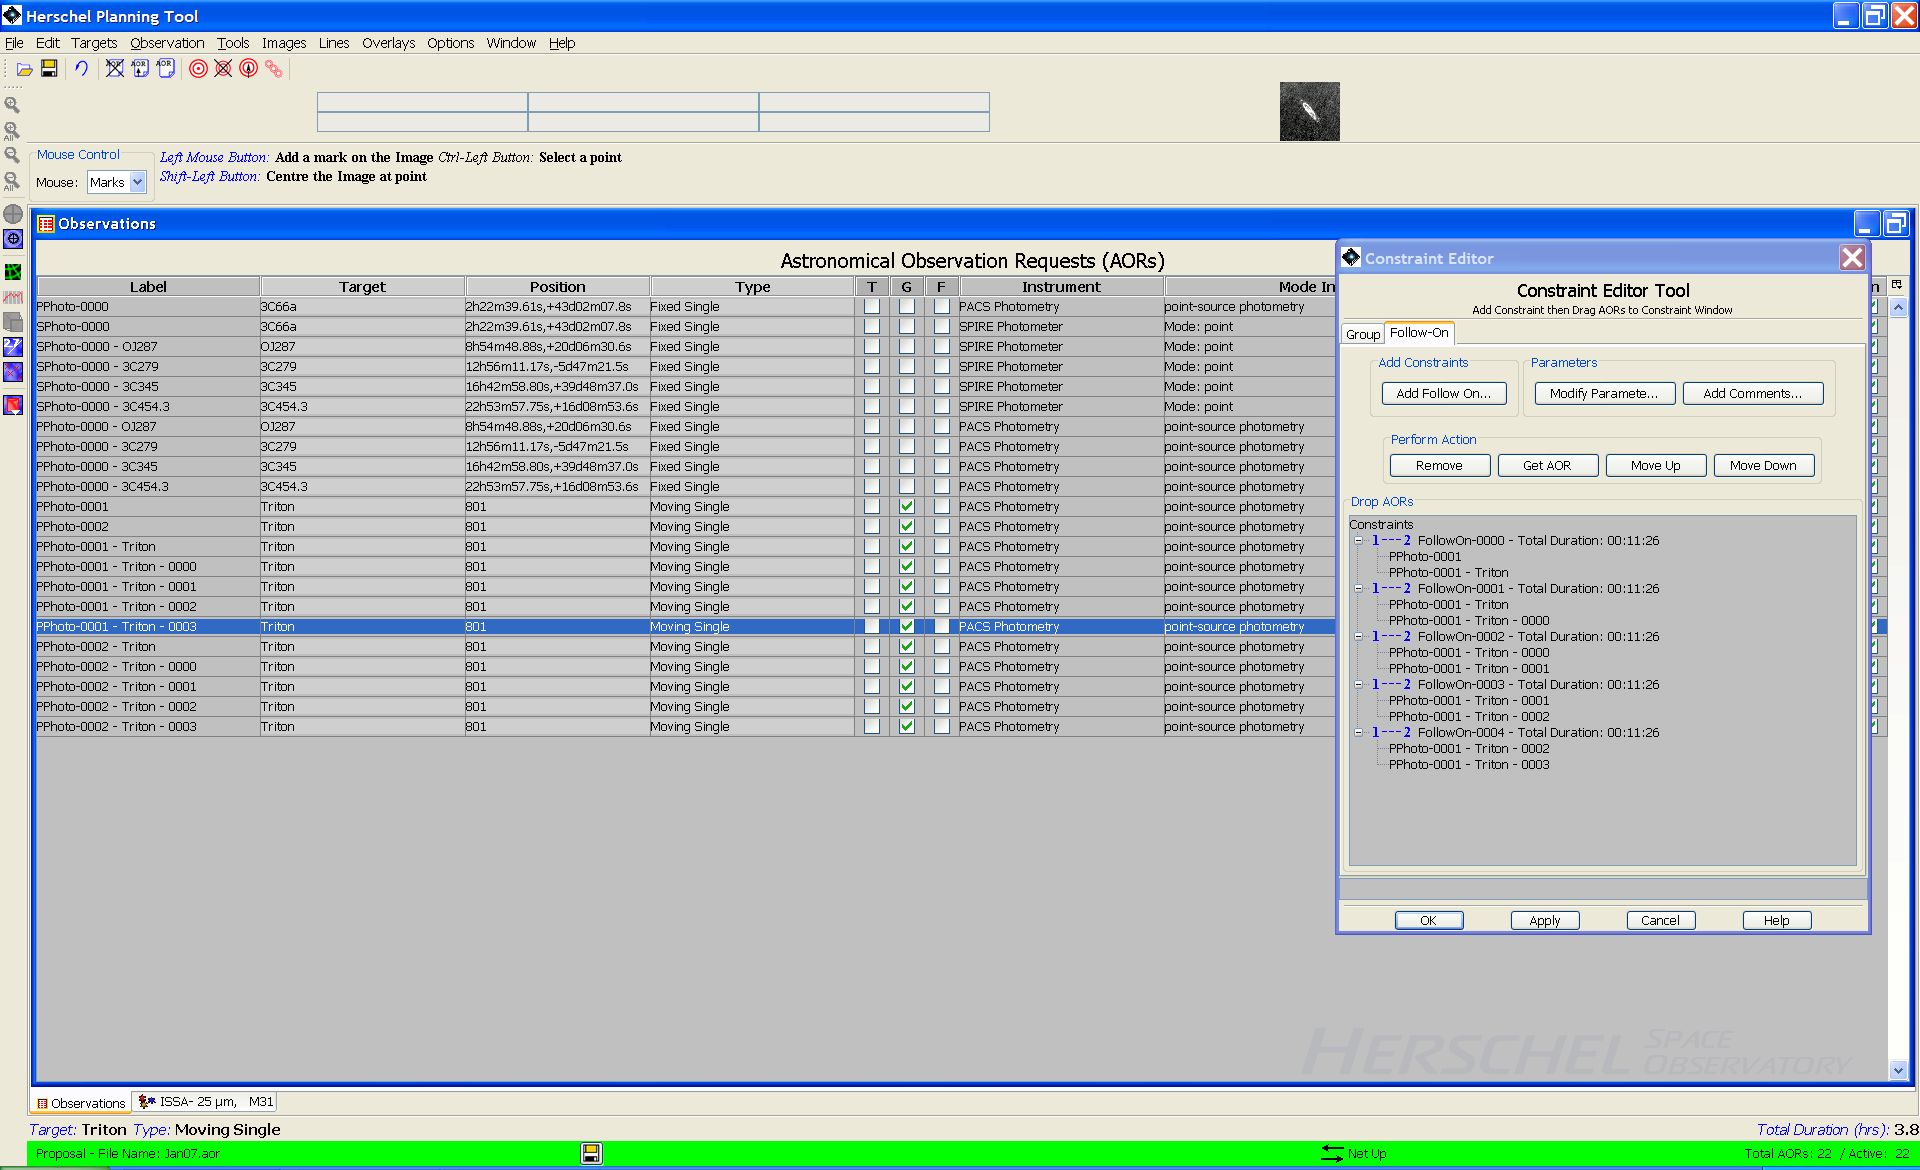
Figure 16.22. The complete sequence of Follow-On observations to observe the 6 chains over the course of a single visibility window.
Click on "Apply" to accept the constraints, when correctly defined and the "OK" to close the window. Now, six AORs are marked in the "F" (Follow-On) column on the main Observations window, as shown in Figure 16.23, “The table of constrained AORs.”.

